

Note: in this blog “Salesforce Experience Cloud” and “Salesforce Community” are used interchangeably.
If you have a Salesforce Community for your organization or use Salesforce Experience Cloud to build a customer portal, there is a good chance that you need to collect one-time or recurring payments.
With the FinDock Payment API, you can create a detailed, fast & secure payment journey in your Salesforce Community, without having to integrate Payment Service Providers yourself! FinDock even makes sure all the relevant data is stored in Salesforce and matched with your existing CRM data. Let’s find out how!
Before that, please do note that the code snippets in this blog are shortened for readability. The full code can be found here: https://github.com/FinDockLabs/findock-experience-cloud-examples. You can fork or clone the repository and deploy the code to your own org with sfdx force:source:deploy.
With the November ’21 release of FinDock, the below is also possible using public Experience Cloud pages!
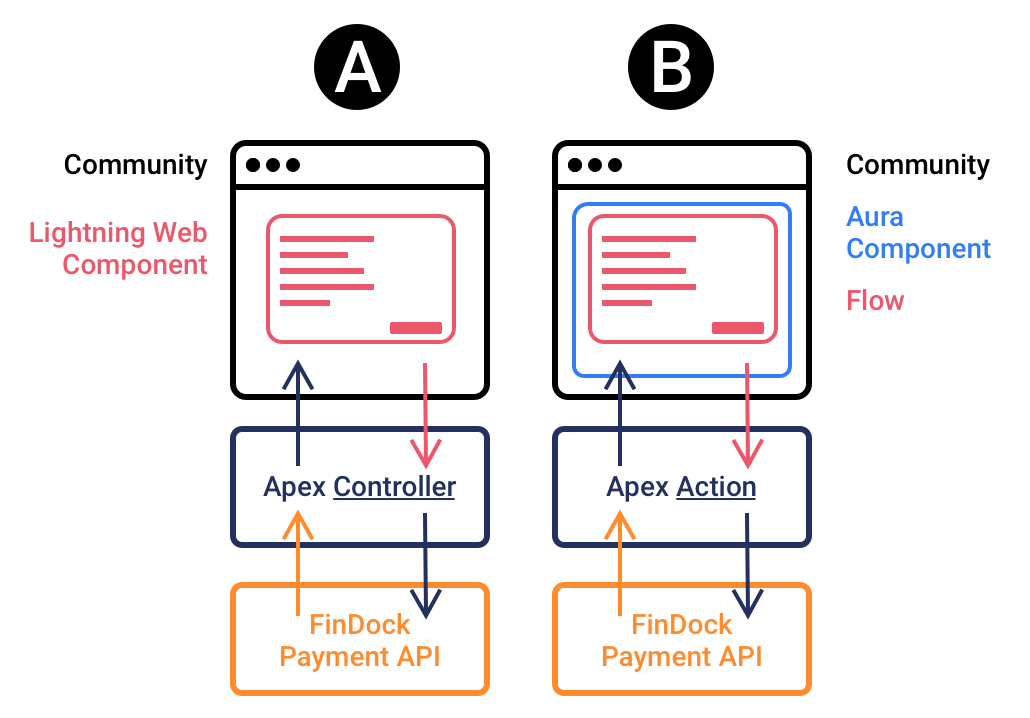
Using the FinDock Payment API with Communities
Integrating Communities with the FinDock Payment API is a little different from integrating to an external service outside Salesforce. By leveraging Salesforce global Apex classes, we can integrate FinDock with Communities and avoid Salesforce limits on API callouts. This also means we do not need to authenticate with Salesforce as an external system. Such an integration greatly increases speed and reduces complexity.
What do we need?
- A way to get information like name, amount, email and preferred payment method. For an example of what that could look like, have a peak at our FinDock Giving Pages.
- A way to pass that data to the FinDock Payment API and handle the response.
How do we build this?
Because of the permissions required to create data in Salesforce, the solution we present here only works end-to-end in private Communities. If you wish to integrate a public Community site, you need to use our Payment API endpoint with the usual authentication.
We can use a mix of Salesforce tools to build our form and our integration with the API. For instance:
- Build a Lightning Web Component (LWC) that uses an Apex Controller to integrate with the Payment API
- Build a Salesforce Flow that uses an Apex Action to integrate with the Payment API and is served inside an Aura Component in a Community.
While using a Lightning Web Component offers you full control over UX, UI and business logic, it does require writing code for the initial integration and for future updates. With Flow, you can build the UI and logic in Salesforce with a point-and-click builder after you have written your initial Apex code to integrate with the API.
If we use the Flow option, there are a couple of ways to do the Apex Class integration:
- Build a JSON string with a formula and pass it to an Invocable Method as an Invocable Variable.
- Pass many Invocable Variables to an Invocable Method directly.
Collect payments with Lightning Web Component
To integrate the Payment API with Communities using a Lightning Web Component, we need two things:
- A Lightning Web Component for the user
- An Apex Controller for the Payment API
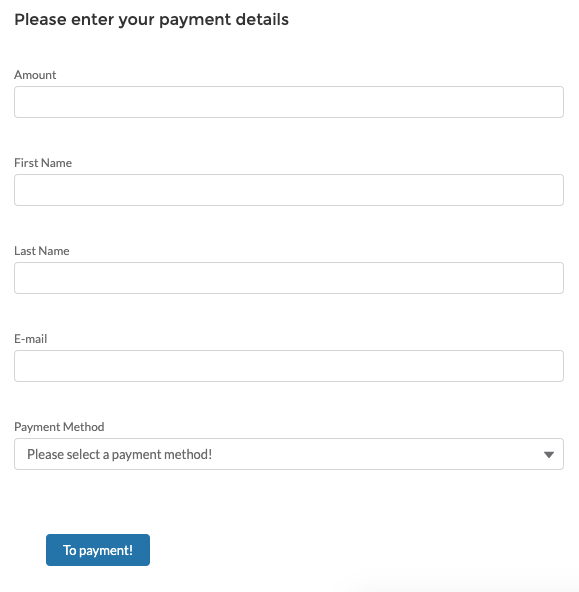
Step 1 – Build your LWC payment form
There’s a few things we always need to create a payment:
- Amount
- Whether it’s a one-time payment or recurring. In this case we’ll work with one-time payments only.
- Payment method
- Details to create a Contact or Account (name and email address)
Since we’re in an authenticated environment, we can get many of these details from Salesforce. If we also know exactly what the customer would like to pay, we can pre-fill these details, or – if there’s an existing Installment in the system – send an InstallmentId to the Payment API instead.
Let’s start by creating a Lightning Web Component communitypayments using SFDX. The HTML file communitypayments.html consists of a form asking the user for the details listed above:
<template>
   <lightning-card  title="Please enter your payment details">
   <div class="slds-m-top_small slds-m-bottom_medium">
       <div class="slds-m-top_medium slds-m-bottom_x-large">
           <div class="slds-p-around_medium lgc-bg">
               <lightning-input type="number" name=amount label="Amount" formatter=currency onchange={handleChange}></lightning-input>
           </div>
           <div class="slds-p-around_medium lgc-bg">
               <lightning-input type="text" name=firstName label="First Name" onchange={handleChange}></lightning-input>
           </div>
           <div class="slds-p-around_medium lgc-bg">
               <lightning-input type="text" name=lastName label="Last Name" onchange={handleChange}></lightning-input>
           </div>
           <div class="slds-p-around_medium lgc-bg">
               <lightning-input type="email" name=email label="E-mail" onchange={handleChange}></lightning-input>
           </div>
           <div class="slds-p-around_medium lgc-bg">
               <lightning-combobox
                   name="paymentMethod"
                   label="Payment Method"
                   value={value}
                   placeholder="Please select a payment method!"
                   options={payment_options}
                   onchange={handleChange}>
               </lightning-combobox>
           </div>
       </div>
       <div class="slds-p-around_medium lgc-bg">
       <lightning-button variant="Brand" label="To payment!" title="to_payment" onclick={handleClick} class="slds-m-left_x-large">
       </lightning-button>
       </div>
   </div>
   </lightning-card>
</template>
Our LWC form should look this:
Step 2 – Start and execute the payment journey
Now that we have the required data, we can make a call to FinDock. Since FinDock is built on Salesforce, instead of calling the Payment API through an endpoint like https://my-organization.eu29.force.com/services/apexrest/cpm/v2/PaymentIntent/, we can directly call the Apex classes and methods that are behind this endpoint.
Let’s say we want to perform a one-time credit card payment with Stripe, one of FinDock’s many pre-integrated payment processors. If we were using the API from outside of Salesforce, we would POST a JSON like this to the /PaymentIntent endpoint.
{
   "SuccessURL": "https://www.example.com/success",
   "FailureURL": "https://www.example.com/error",
   "Payer": {
       "Contact": {
           "SalesforceFields": {
               "FirstName": "Eric",
               "LastName": "Johnson",
               "Email": "eric@johnson.com"
           }
       }
   },
   "OneTime": {
       "Amount": "15"
   },
   "PaymentMethod": {
       "Name": "CreditCard",
   }
}
From a Community – or any other place in Salesforce where we can execute Apex – we can build the same JSON, but pass it to the cpm.API_PaymentIntent_V2.postPaymentIntent() method. Here, we use an Apex Controller.
Behind our HTML form, our communitypayments.js handles the input and passes a JSON object string to our Apex Controller FinDockCommunityController.cls.
import { LightningElement, track } from 'lwc';
import { NavigationMixin } from 'lightning/navigation';
import submit from '@salesforce/apex/FinDockCommunityController.submit';

export default class Findockcommunitypayments extends NavigationMixin(LightningElement) {
   amount = 0;
   firstName = '';
   lastName = '';
   email = '';
   paymentMethod = '';
   // installmentId = '';

   // Options for payment method combobox.
   // Instead of hardcoding, you could get the values of the cpm__Payment_Method__c picklist on cpm__Installment__c.
   get payment_options() {
       return [
           { label: 'Credit Card', value: 'CreditCard' },
           { label: 'iDEAL', value: 'ideal' },
           { label: 'Direct Debit', value: 'Direct Debit' },
       ];
   }

   // Capture field input
   handleChange(event) {
       this[event.target.name] = event.target.value;
   }

   // Handle the clicking of the 'To payment' button
   handleClick( event ) {
       // Create our API input from the user input
       var input = {
           SuccessURL: 'https://example.com/success',
           FailureURL: 'https://example.com/failure',
           Payer: {
               Contact: {
                   SalesforceFields : {'FirstName': this.firstName,'LastName': this.lastName, 'Email' : this.email}
               }
           },
           OneTime: {
               Amount: this.amount
               // If you provide an existing InstallmentId, you can leave OneTime.Amount and Payer empty or out.
               // Id: this.installmentId

           },
           PaymentMethod: {
               Name: this.paymentMethod
               // Note that we are not passing a specific Payment Processor,
               // so the API will use the default processor for this payment method set in FinDock
           },
       }
       // Bundle the form input with additional parameters that the API requires...
       // ...and trigger API Call to FinDock through the Apex Controller.
       submit({
           jsonObject: JSON.stringify(input)
We could also dynamically build the set of payment methods to offer based on, for instance, the cpm__Installment__c.cpm__Payment_Method__c picklist in Salesforce or an API call to the /PaymentMethods endpoint of our API. This way we avoid hardcoding the payment method options in the payment form and allows making changes through settings in the org instead of in the form code.
This Apex Controller holds the structure of the object PaymentIntent that is expected by the API. All variables are tagged @AuraEnabled so they can be used by our LWC.
public class PaymentIntent {
       @AuraEnabled
       public String Id{get;set;}
       @AuraEnabled
       public String SuccessURL{get;set;}
       @AuraEnabled
       public String FailureURL{get;set;}
       @AuraEnabled
       public String RedirectURL{get;set;}
       @AuraEnabled
       public Payer Payer{get;set;}
       @AuraEnabled
       public OneTime OneTime{get;set;}
       @AuraEnabled
       public PaymentMethod PaymentMethod{get;set;}
   }
It also has an @AuraEnabled method that handles the interaction with the FinDock API.
// Submit the payment to the Payment API.
   @AuraEnabled(cacheable=false)
   public static PaymentIntent submit(String jsonObject) {

       // Build your API request...
       RestRequest req = new RestRequest();
       RestResponse res = new RestResponse();
       RestContext.request = req;
       RestContext.response = res;
       // Use URL.getOrgDomainURL for Salesforce API v59.0 or higher
       req.requestURI = URL.getSalesforceBaseUrl().toExternalForm()+'/services/apexrest/v2/PaymentIntent';
       req.httpMethod = 'POST';

       // ...with the input from the user...
       PaymentIntent body = (PaymentIntent)JSON.deserializeStrict(jsonObject, PaymentIntent.class );
       req.requestBody = Blob.valueOf(JSON.serialize(body, true));

       // ...and send the Payment Intent to the FinDock Payment API, by calling the Apex method!
       cpm.API_PaymentIntent_V2.postPaymentIntent();
This generates the same response as a POST to the /PaymentIntent endpoint, containing a RedirectURL to a hosted payment or checkout page of the payment processor.
We can parse out the RedirectURL and send it back to our LWC.
// Get the response from the FinDock Payment API...
       Map<String, Object> responseMap = (Map<String, Object>)JSON.deserializeUntyped(res.responseBody.toString());
       system.debug(responseMap);

       // Check for errors.
       if (res.statusCode != 200) {
         // Do something to throw or handle error. See Error object.
         system.debug(responseMap);
       }

       PaymentIntent result = new PaymentIntent();

       // If API call was successfull.
       if (res.statusCode == 200) {
           // ...but most important: the Redirect URL to the Hosted Payment Page of the Processor!
           result.RedirectUrl = (String)responseMap.get('RedirectURL');
       }

       // Return the result to your LWC
       return result;
   }
In the LWC `communitypayment.js` we redirect the user to the hosted payment page or checkout page of the PSP (if required):
// Bundle the form input with additional parameters that the API requires...
       // ...and trigger API Call to FinDock through the Apex Controller.
       submit({
           jsonObject: JSON.stringify(input)
       // Handle the result of the API call returned by the Controller
       }).then( result => {
           console.log(result)
           // Get the RedirectURL from the result...
           this.RedirectURL = result.RedirectURL;
           // ...and redirect to the Hosted Payment Page of the Payment Processor if required.
           this[NavigationMixin.Navigate]({
               type: 'standard__webPage',
               attributes: {
                   url: this.RedirectURL
               }
           });
       // Catch errors
       }).catch ( error => {
          // Handle errors based on error message
       });
   }
}
Some payment method and processor combinations don’t require a redirect to a hosted payment page, like SEPA or Bacs direct debits through FinDock, so the above redirect solution is not required in all cases.
FinDock automatically updates all the data – including updates to the status of the payment – in Salesforce. This way you can continue the customer journey using detailed information about the payment, like sending a thank-you email or asking to retry a failed payment.
Launching your form
To be able to collect payments, the Site Guest User of your Community needs the right permissions. Make sure to assign the following permissions to this user:
- FinDock Experience Cloud permission set.
- The permission set(s) for the payment processors you are using.
- Access to the Apex Controller you created.
Now that your code is written and permissions are set, simply add the Lightning Web Component to your Salesforce Community by dragging it onto the page to start collecting payments!
Using Flow to make it point-and-click
Now this LWC option is already quite cool. However, each time we want to add a field to the payment form or change the behavior, we need to code. We could take the payment integration one step further and write an Apex Action with an Invocable Method. Using the power of the Salesforce platform, we can embed this code into a Flow to create the form and execute the API call, all with point-and-click. Read all about it in part 2 of this blog series!
If you would like to learn more about how to use the Payment API, please visit our Knowledge Base.