

Note: in this blog “Salesforce Experience Cloud” and “Salesforce Community” are used interchangeably.
In part 1 of this series we showed how to collect payments in a Salesforce Community using the FinDock Payment API, Lightning Web Components and Apex. Now we’ll show you how to build the same form using the power of Salesforce Flow.
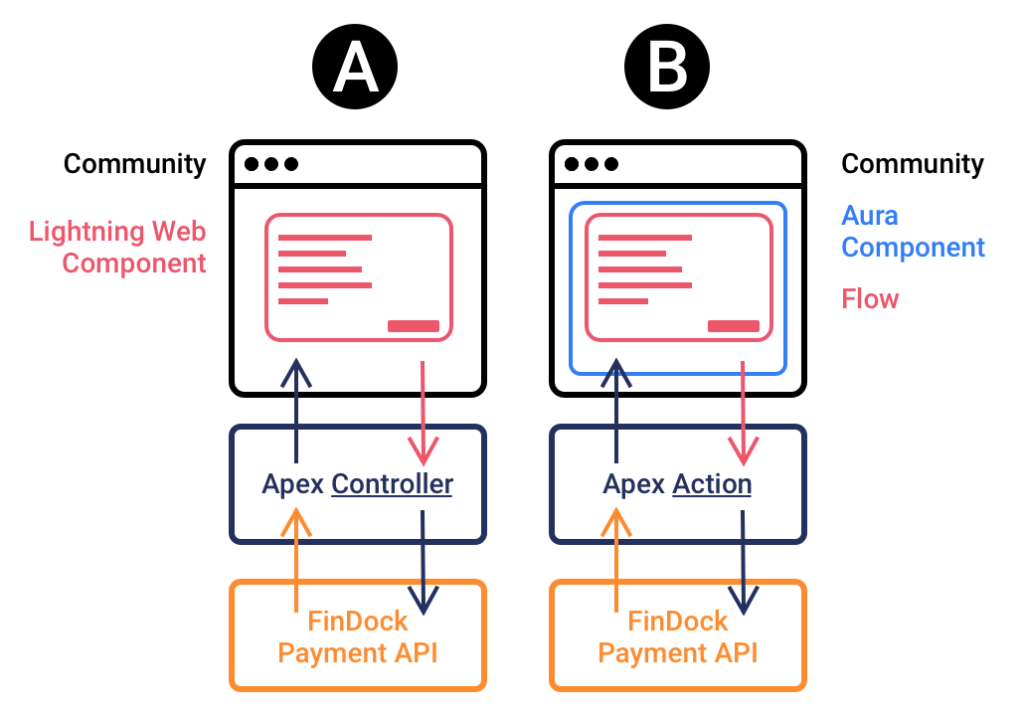
To integrate the Payment API into Salesforce Communities we need to create 3 components:
- A Flow with input screens and business logic
- An Aura component to add to a Community where the Flow can be embedded
- An Apex Action class to interact with the Payment API
As in part 1, the code snippets in this blog are shortened for readability. The full code – and the Flows – can be found here: https://github.com/FinDockLabs/findock-experience-cloud-examples. You can fork or clone the repository and deploy the code to your own org with `sfdx force:org:deploy`.
With the November ’21 release of FinDock, the below is also possible using public Experience Cloud pages!
Creating an interface for your Flow
Because of the permissions required to create data in Salesforce, the solution we present here only works in private Communities.
Instead of starting with the form, this time we start with the back-end and work our way to the front. To enable our Flow to execute payments, we create an Apex Action FinDockCommunityPaymentActionInvocables.cls. This Apex Action has an InvocableMethod that takes a list of @InvocableVariables as input. The FlowInputOutput variables are tagged with @InvocableVariable so they can be accessed by a Flow.
  // Wrapper class for input and output of Flow.
       public class flowInputOutput {
           @InvocableVariable
           public String successURL;
           @InvocableVariable
           public String failureURL;
           @InvocableVariable
           public Double amount;
           @InvocableVariable
           public String installmentId;
           @InvocableVariable
           public String contactFirstName;
           @InvocableVariable
           public String contactLastName;
           @InvocableVariable
           public String contactEmail;
           @InvocableVariable
           public String paymentMethod;
           @InvocableVariable
           public String paymentProcessor;
           @InvocableVariable
           public String redirectURL;
           @InvocableVariable
           public Integer status;
       }
However, since there are several limitations to Invocable Variables – like not supporting Inner Classes or Maps – you need to usea bit of code to transform the input into a proper API message. For a suggestion on how to do this, you can find example Apex Action FinDockCommunityActionInvocables.cls, Flow and Aura components in the repository here: https://gitlab.com/findock/findock-community-examples.
The Invocable Variables are turned into a proper `PaymentIntent`.
//Unpacks Flow input, submits payment to API and returns API response to Flow
       @InvocableMethod(label='FinDockCommunitySubmitPayment' description='Create a payment with FinDock by passing me a String in the shape of a JSON as defined in https://docs.findock.com/api')
       public static List<FlowInputOutput> submitPamentIntent(List<FlowInputOutput> flowInputs) {

           List<FlowInputOutput> outputs = new List<FlowInputOutput>();

           for (FlowInputOutput flowInput: flowInputs) {

               PaymentIntent requestBody = new PaymentIntent();
               requestBody.SuccessURL = flowInput.successURL;
               requestBody.FailureURL = flowInput.failureURL;

               // Create a OneTime object with an Amount. Replace with Recurring object for Recurring payments.
               requestBody.OneTime = new OneTime();
               requestBody.OneTime.Amount = flowInput.amount;
               // If you provide an existing InstallmentId, you can leave OneTime.Amount and Payer empty or out.
               // requestBody.OneTime.Id = flowInput.installmentId;

               // Contact and Account fields can be passed in a SalesforceFields object that accepts ALL standard and custom fields on these objects.
               Map<String, String> contactFields = new Map<String, String>();
               contactFields.put('FirstName', flowInput.contactFirstName);
               contactFields.put('LastName', flowInput.contactLastName);
               contactFields.put('Email', flowInput.contactEmail);
               requestBody.Payer = new Payer();
               requestBody.Payer.Contact = new Contact();
               requestBody.Payer.Contact.SalesforceFields = contactFields;

               // Assign a payment method.
               // We're not explicitly passing a processor, so the API will use the default processor for the chosen payment method.
               requestBody.PaymentMethod = new PaymentMethod();
               requestBody.PaymentMethod.Name = flowInput.paymentMethod;

               // Submit the request body to the API and get the response
               PaymentIntentResponse response = PaymentIntent.submit(requestBody);
This `PaymentIntent` is then passed to the FinDock Payment API:
// Submit the payment to the Payment API.
       public static PaymentIntent submit(PaymentIntent body) {

           // Build your API request...
           RestRequest req = new RestRequest();
           RestResponse res = new RestResponse();
           RestContext.request = req;
           RestContext.response = res;
           req.requestURI = URL.getSalesforceBaseUrl().toExternalForm()+'/services/apexrest/v2/PaymentIntent';
           req.httpMethod = 'POST';

           // ...with the input from the user...
           // PaymentIntent body = (PaymentIntent)JSON.deserializeStrict(jsonObject, PaymentIntent.class );
           req.requestBody = Blob.valueOf(JSON.serialize(body, true));

           // ...and send the Payment Intent to the FinDock Payment API, by calling the Apex method!
           cpm.API_PaymentIntent_V2.postPaymentIntent();
And the result – which can be a `PaymentIntent` object when successful or a list of errors – is returned to the Flow:
// Get the response from the FinDock Payment API...
           Map<String, Object> responseMap = (Map<String, Object>)JSON.deserializeUntyped(res.responseBody.toString());
           system.debug(responseMap);

           PaymentIntentResponse result = new PaymentIntentResponse();
           result.status = res.statusCode;

           // Check for errors.
           if (res.statusCode != 200) {
               // Do something to throw or handle error. See Error object.

               Error error = new Error();
               //get first error
               List<Object> errors = (List<Object>)responseMap.get('Errors');
               if (!errors.isEmpty()) {
                   error.error_message = (String)((Map<String, Object>)errors[0]).get('error_message');
                   error.error_code = (String)((Map<String, Object>)errors[0]).get('error_code');
               }
               system.debug(error);
               result.Error = error;
           }

           // If API call was successfull.
           if (res.statusCode == 200) {
               PaymentIntent pi = new PaymentIntent();

               // ...parse valuable data like the Payment Intent Id of your call that's stable accross all FinDock communication like webhooks...
               pi.Id = (String)responseMap.get('Id');

               // ...and maybe some additional information like Payment method and Processor used
               Map<String, Object> paymentMethodMap = (Map<String, Object>)responseMap.get('PaymentMethod');
               if (paymentMethodMap != null) {
                   pi.PaymentMethod = new PaymentMethod();
                   pi.PaymentMethod.Name = (String)paymentMethodMap.get('Name');
                   pi.PaymentMethod.Processor = (String)paymentMethodMap.get('Processor');
               }
               // ...but most important: the Redirect URL to the Hosted Payment Page of the Processor!
               pi.RedirectUrl = (String)responseMap.get('RedirectURL');
               result.paymentIntent = pi;
           }

           // Return the result to your LWC
           return result;
User interaction and payment execution
Now that we have a way for our Flow to interact with the Payment API, we build a Flow FinDock_Community_Payment_Invocables.
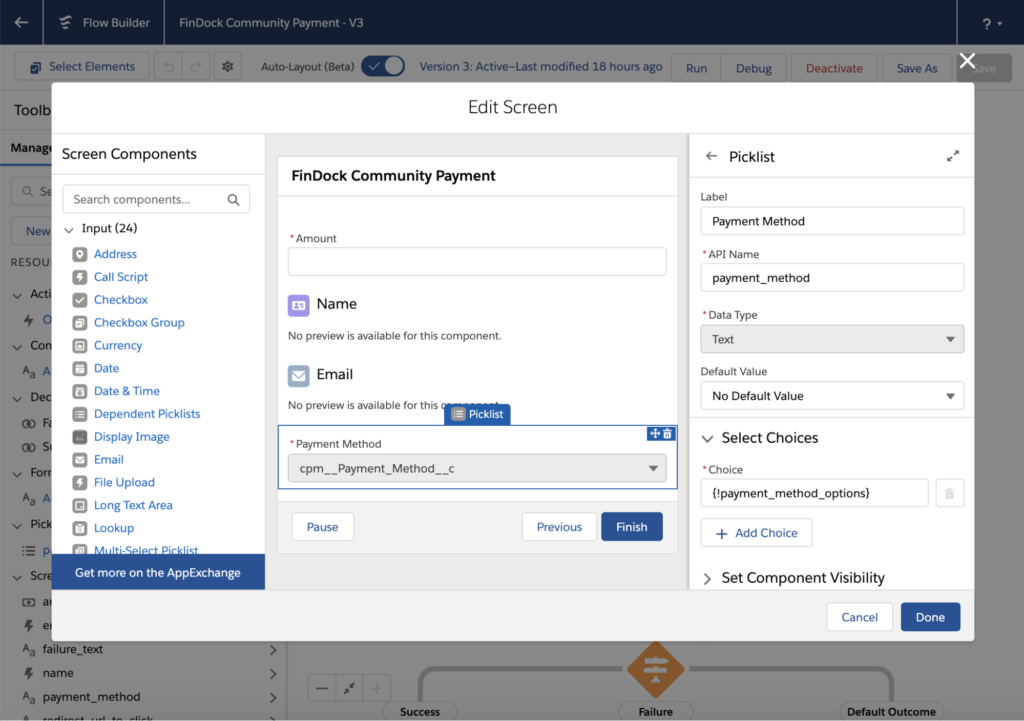
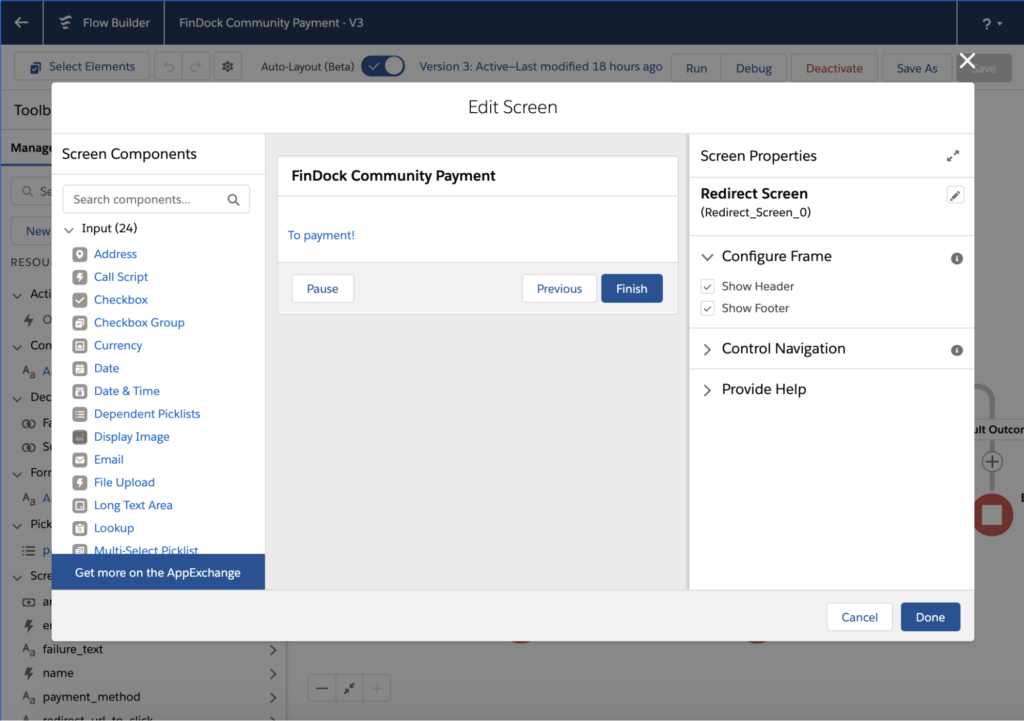
In this Flow, we first create a Screen with input fields for:
- An amount
- A minimal set of personal details to create a Contact or Account; in this example, first name, last name and email
- A payment method
Since we’re in an authenticated environment where we know the user, we can get many of these details, and even the preferred payment method, from Salesforce. If we also know what the customer would like to pay, we can pre-fill these details, or – if there’s an existing Installment in the system – send an InstallmentId to the Payment API instead.
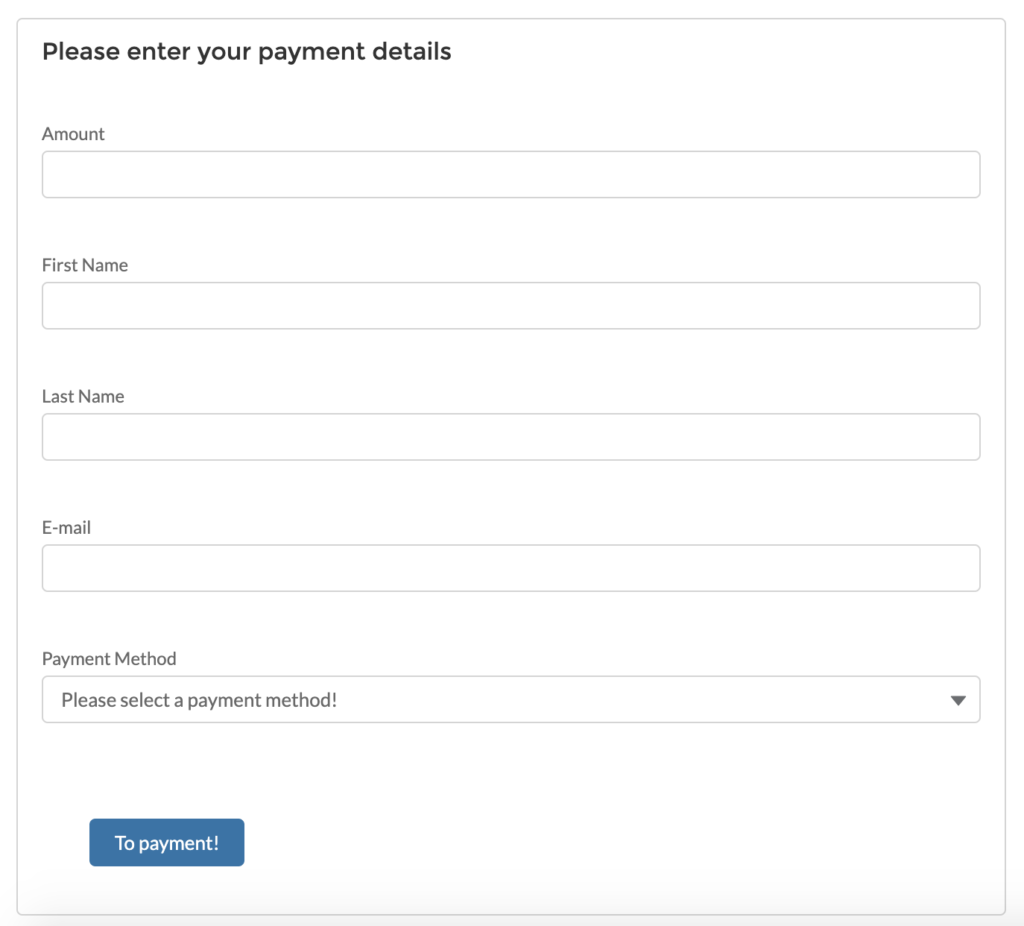
Our Flow screen looks something like this:
Now that we have our input values, we can create a new Action from our Apex Method and map the input variables to the Invocable Variables of the Apex Action.
Response handling
Now that we have executed our API call, we need to handle the response and help our user complete the payment based on their payment method choice.
First, we set the `RedirectURL` and the `Status` of the API call from the response.
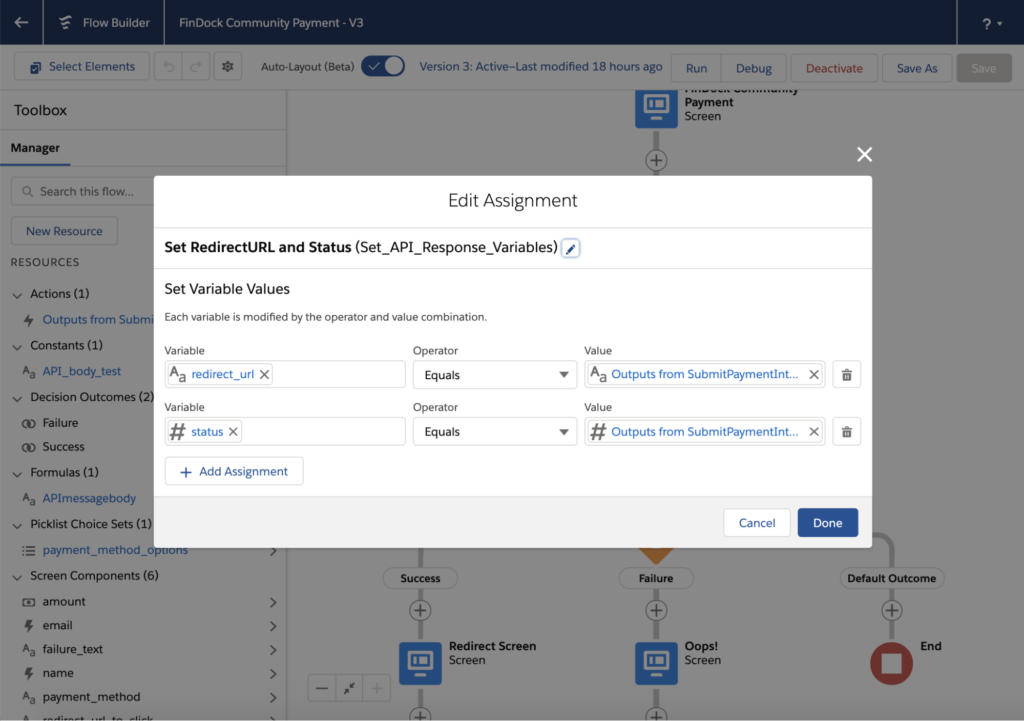
Next, based on whether the status is 200 OK or 4xx or 5xx NOT OK, we send the user to an error page with additional instructions, or to a screen with a URL to the Hosted Payment Page of the PSP.
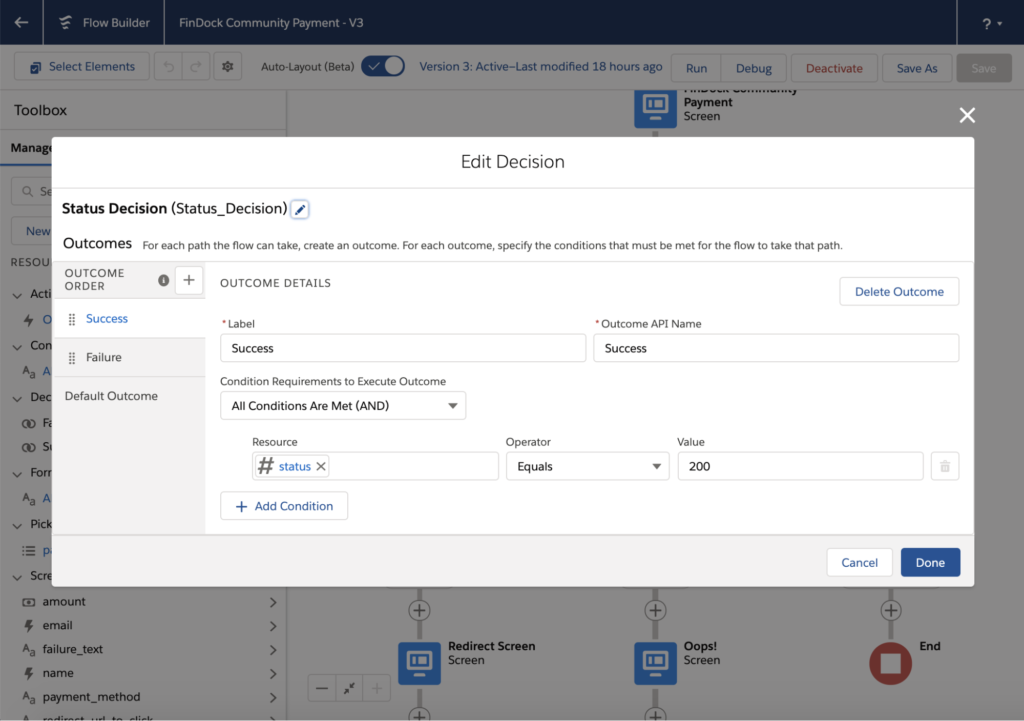
Some payment method and processor combinations don’t require a redirect to a Hosted Payment Page, like SEPA and Bacs direct debit through FinDock. In such cases, we can go directly to the Success URL.
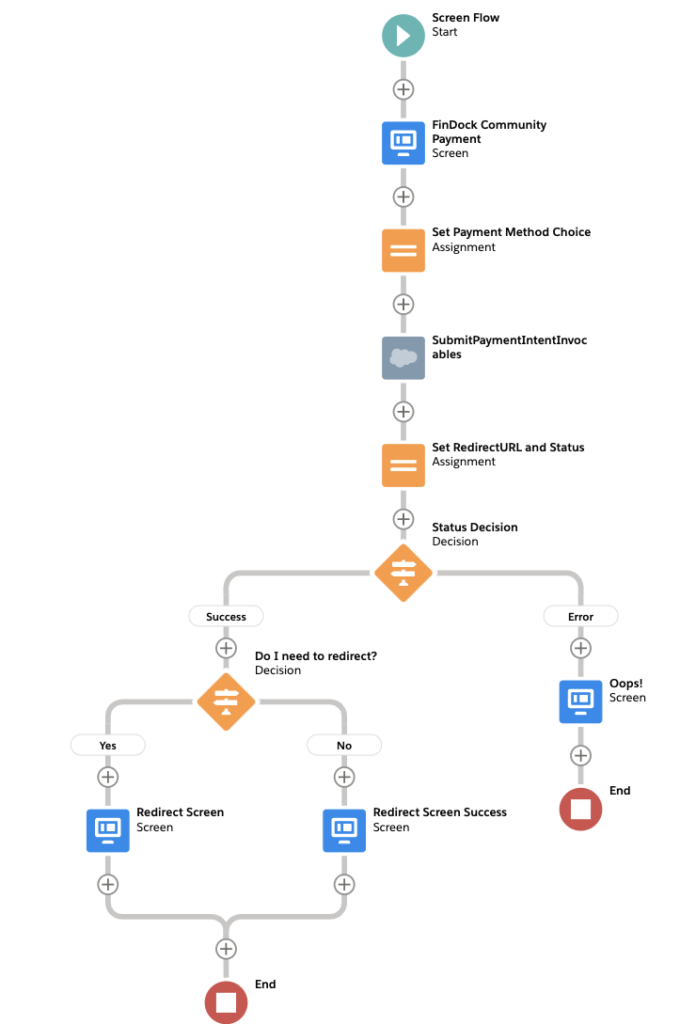
In the end, your entire Flow should look something like this:
Adding the Flow to your Salesforce Community
Our Flow is done, but unlike Lightning Web Components they cannot be added directly to a Community page (at least not yet). To launch our payment form, we need an Aura component. We create an Aura component `FinDockCommunityPaymentActionInvocablesFlow` with at least a Component file .cmp and a Controller .js
In the `FinDockCommunityPaymentActionFlow.cmp` file, we specify that the Aura component may be used in a Community by implementing the `forceCommunity:availableForAllPageTypes` interface, and we set the Id of our Flow.
<aura:component implements="forceCommunity:availableForAllPageTypes" access="global">
   <aura:handler name="init" value="{!this}" action="{!c.init}" />
   <lightning:flow aura:id="FinDockCommunityPaymentInvocablesFlow" />
</aura:component>
In our Controller `FinDockCommunityPaymentActionFlow.js`, we set this Id and find the Flow in the Org by it’s Id.
({
   init : function (component) {
       // Find the component whose aura:id is "flowData"
       var flow = component.find("FinDockCommunityPaymentInvocablesFlow");
       // In that component, start your flow. Reference the flow's API Name.
       flow.startFlow("FinDock_Community_Payment_Invocables");
   },
})
Now your form is ready to be launched! Simply drag the Aura component on a Salesforce Community page and publish.
NOTE: To be able to collect payments, the Site Guest User of your Community needs the right permissions. Make sure to assign the following permissions to this user:
- FinDock Guest User permission set.
- The permission set(s) for the payment processors you are using.
- Access to the Apex Action you created.
Even less code: Let the Flow decide what to do with the API
Using Invocable Variables means you need to define all possible variables in your Apex Class. To avoid code changes after the first implementation, you can define a very broad list of fields to use. Another way of making the integration between the Flow and the Apex Action more flexible is to define all the API logic outside of the Flow.
Instead of passing specific Invocable variables, you can create a formula field that creates an API message and pass that to a single Invocable Variable.
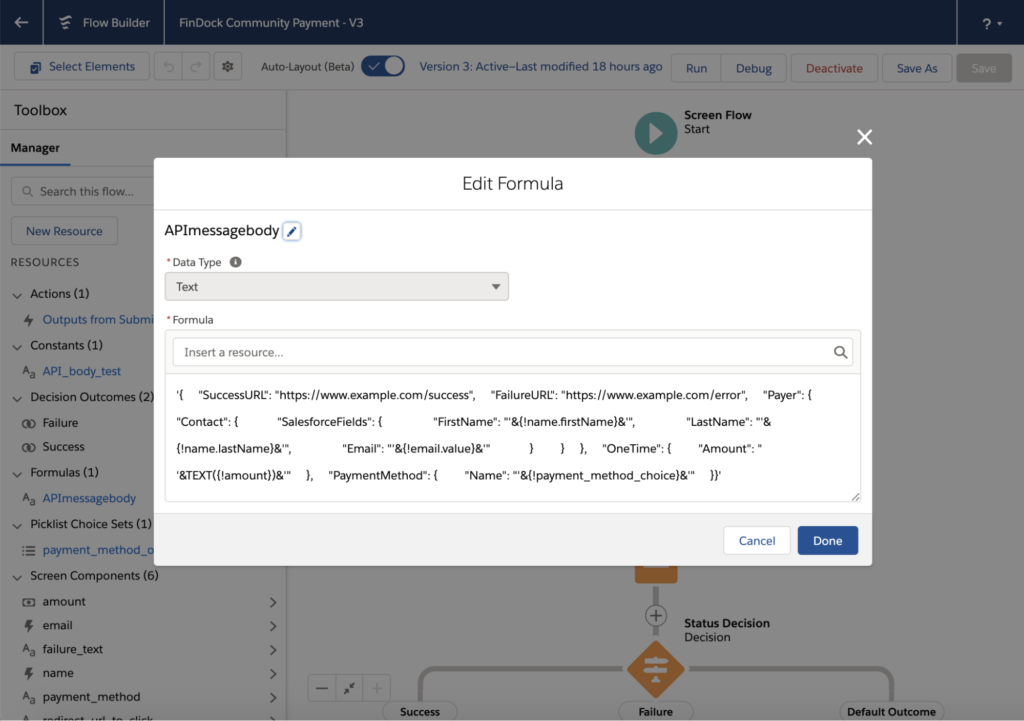
Make sure to get all the string tags right!
'{
   "SuccessURL": "https://www.example.com/success",
   "FailureURL": "https://www.example.com/error",
   "Payer": {
       "Contact": {
           "SalesforceFields": {
               "FirstName": "'&{!name.firstName}&'",
               "LastName": "'&{!name.lastName}&'",
               "Email": "'&{!email.value}&'"
           }
       }
   },
   "OneTime": {
       "Amount": " '&TEXT({!amount})&'"
   },
   "PaymentMethod": {
       "Name": "'&{!payment_method_choice}&'"
   }
}'
A full example of the required Apex Action to handle this can be found in the repository as FinDockCommunityAction.cls with Flow flow/FinDockCommunityPayment.flow-meta.xml.
If you would like to learn more about how to use the Payment API, please visit our Knowledge Base.